Sticking to it - Brioche
After experimenting with a few recipes and making things up, I’ve decided to stick to a recipe and see how I get on. This time I went for Nancy Silverton’s Brioche bread, from her La Brea Bakery book.
I’ve tried this recipe about six months ago, and got one of the best praises ever – “its just like what I buy in Paris”, from a guy who only just got back from France – you can’t get better than that, can you?
I don’t think I can publish the actual recipe, cause I think that might be breaching book’s copyright, but I can tell you about the experience and get a chance to show off all the lovely photos :)
The recipe uses starter as well as yeast, and I am thinking about testing out again soon, but without the yeast, then I will post the actual recipe, as it won’t be Nancy’s exact recipe any more, but my version of it – I think that would work.
So, it’s classified as a three day bread, but don’t let it scare you, the actual hands on effort is very minimal, and you can easily fit it into your work day schedule.
I wanted to have the brioche ready for Saturday morning, so I’ve started on the recipe Wednesday night. First you make a sponge out of water, starter, milk, yeast and flour and leave it overnight at room temperature. Check it Thursday morning – looking quite bubbly, and put it in the fridge for the whole day to do its thing while you go to work. Thursday night is the actual mixing up dough night – adding eggs, sugar, flour, salt and butter to the sponge and doing A LOT of mixing. I would suggest you don’t attempt this recipe unless you have a mixer of some sort. My dough needed something like 20 minutes of mixing on quite high setting, and I cannot imagine doing it all by hand, it would take a long long long long time. And I would imagine it’d be hard to achieve the right type of consistency, I had proper window-pane texture but the time I finished with it, looked very soft and very sticky.
The recipe actually makes two loaves of raisin brioche, but I prefer my brioche plain, so I omitted the raising and didn’t use anything else instead, I was going for a super-soft crumb.
Anyway, with dough all mixed, put it back in the fridge for 12 to 24 hours, meaning you don’t have to worry about it until Friday afternoon / evening.
I was working from home on Friday, so started on the loaves around 4 – 5 afternoon, leaving enough time for the loaves to be shaped and to proof.
Divide the dough into two, shape each half into a loaf and place into a greased tin (like you need any more butter :) and cover with plastic. The recipe tells me to leave it to proof for four hours at room temperature, but I was getting a bit impatient at this stage and placed the loaves in a hot-water cabinet to speed things up a bit. After three hours, the loaves were looking nice and puffy and nearly ready to go into the over. I turned the oven on to pre-heat, brushed the tops of the loaves with egg wash and left them sitting at room temperature for another 40 minutes or so, until the over was hot enough.
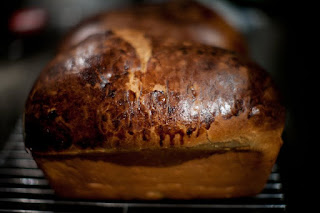
You need to bake your brioche on the lowest over rack you’ve got, to make sure that tops don’t get burnt. The recipe tells me to bake it for 40 minutes, but I had to take mine after 20 minutes, as they were getting really dark brown on top and felt like they were done already. The loaves sprung to much!!! They nearly doubled in size during the baking, looking nice and round on top.
Leave the loaves to cool slightly in the tins, take the loaves out and leave to cool overnight.
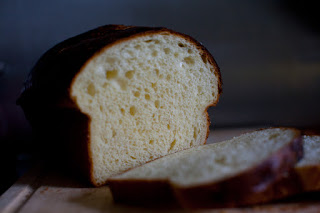
They looked so good on the outside, I couldn’t wait to cut into them and see what they look like inside. And I must say, it was worth the wait – the crumb is so light and lovely, amazing taste too, not too sweet, just how I wanted it.
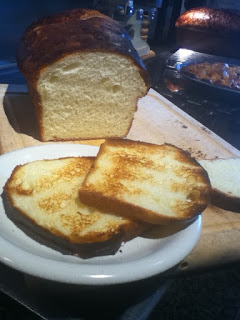
It makes a perfect Sunday breakfast, toasted with a but of butter and apricot jam – divine!!!!!!

PS: Mr Ranty is responsible for the pictures, thats why the quality and composition is so much better. All the ones above are his, and the one below is mine - spot the difference :) I
I’ve tried this recipe about six months ago, and got one of the best praises ever – “its just like what I buy in Paris”, from a guy who only just got back from France – you can’t get better than that, can you?
I don’t think I can publish the actual recipe, cause I think that might be breaching book’s copyright, but I can tell you about the experience and get a chance to show off all the lovely photos :)
The recipe uses starter as well as yeast, and I am thinking about testing out again soon, but without the yeast, then I will post the actual recipe, as it won’t be Nancy’s exact recipe any more, but my version of it – I think that would work.
So, it’s classified as a three day bread, but don’t let it scare you, the actual hands on effort is very minimal, and you can easily fit it into your work day schedule.
I wanted to have the brioche ready for Saturday morning, so I’ve started on the recipe Wednesday night. First you make a sponge out of water, starter, milk, yeast and flour and leave it overnight at room temperature. Check it Thursday morning – looking quite bubbly, and put it in the fridge for the whole day to do its thing while you go to work. Thursday night is the actual mixing up dough night – adding eggs, sugar, flour, salt and butter to the sponge and doing A LOT of mixing. I would suggest you don’t attempt this recipe unless you have a mixer of some sort. My dough needed something like 20 minutes of mixing on quite high setting, and I cannot imagine doing it all by hand, it would take a long long long long time. And I would imagine it’d be hard to achieve the right type of consistency, I had proper window-pane texture but the time I finished with it, looked very soft and very sticky.
The recipe actually makes two loaves of raisin brioche, but I prefer my brioche plain, so I omitted the raising and didn’t use anything else instead, I was going for a super-soft crumb.
Anyway, with dough all mixed, put it back in the fridge for 12 to 24 hours, meaning you don’t have to worry about it until Friday afternoon / evening.
I was working from home on Friday, so started on the loaves around 4 – 5 afternoon, leaving enough time for the loaves to be shaped and to proof.
Divide the dough into two, shape each half into a loaf and place into a greased tin (like you need any more butter :) and cover with plastic. The recipe tells me to leave it to proof for four hours at room temperature, but I was getting a bit impatient at this stage and placed the loaves in a hot-water cabinet to speed things up a bit. After three hours, the loaves were looking nice and puffy and nearly ready to go into the over. I turned the oven on to pre-heat, brushed the tops of the loaves with egg wash and left them sitting at room temperature for another 40 minutes or so, until the over was hot enough.
You need to bake your brioche on the lowest over rack you’ve got, to make sure that tops don’t get burnt. The recipe tells me to bake it for 40 minutes, but I had to take mine after 20 minutes, as they were getting really dark brown on top and felt like they were done already. The loaves sprung to much!!! They nearly doubled in size during the baking, looking nice and round on top.
Leave the loaves to cool slightly in the tins, take the loaves out and leave to cool overnight.

They looked so good on the outside, I couldn’t wait to cut into them and see what they look like inside. And I must say, it was worth the wait – the crumb is so light and lovely, amazing taste too, not too sweet, just how I wanted it.
It makes a perfect Sunday breakfast, toasted with a but of butter and apricot jam – divine!!!!!!


PS: Mr Ranty is responsible for the pictures, thats why the quality and composition is so much better. All the ones above are his, and the one below is mine - spot the difference :) I

Comments
Post a Comment